Creating and Editing Groups
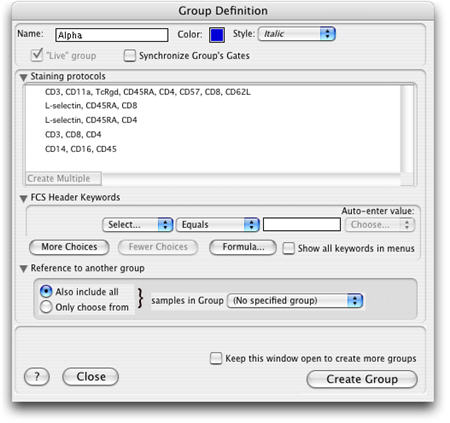
When you create a new group, you are presented with the dialog window below. This window also appears when you double-click on a group in order to edit the criteria for membership.

FlowJo examines all data files in your workspace to build a list of the different staining panels. These are shown in the list box in the middle. You can select one or more of these to state that only samples stained with the particular combination of reagents should be added to the group.
If you select multiple stains, you can choose the Create Multiple button to make a separate group for each selected reagent panel.
You can also specify one or more criteria based on FCS keyword values. Select an FCS keyword, a comparison, and the value to compare against; FlowJo will add samples only if they meet the selected criteria.
The Formula button translates the criteria chosen above to a formula.
Finally, you can specify that the group take its samples only from another group (or to use all samples in another group)--essentially providing you with the ability to make subgroups. Samples must fit all criteria specified in this window in order to be added to the group.
You may manually add samples to a group by dragging and dropping them in the workspace window. They will automatically become members of the group irrespective of the criteria you have established for the group. You may also remove samples from a group by selecting and deleting them (they will not be deleted from the workspace as long as they are members of the All Samples group).
If you select the "Live" group checkbox at the upper left, FlowJo will examine any new data files that you bring into the workspace to see if they fit the criteria for this group. If they do, then they are automatically added to the group, and any group-based analyses are performed on them as well. If you are constructing "template" workspaces for future use by yourself or others, make sure that your groups are "Live" groups.
If you choose to Synchronize Group's Gates, FlowJo will automatically update the gates for all the samples in a group as soon as you adjust a gate on one sample. This option saves time by applying newly adjusted gates automatically to all the samples in the group; skipping the step of dragging the newly adjusted gate up onto the group name. However, it does not allow between-sample-variation of gates. All the gates will be the same as the last adjusted gate on any sample in the group.
The color and style apply not only to the nodes of the group in the group list window, but also to any node in the samples which was created by the group AND is still identical to the group's version of the gate. This is how you can tell if a gate has been modified from the group's version: it will not appear in the same color/style as the group's version, but rather in black and plain text. Therefore, you should avoid having group nodes be shown in black with plain text: as you would be unable to distinguish between gates which belong to the sample, and gates which belong to the group.
You can reopen this dialog and change group attributes such as the name, style, and color of a group as well as automatic sample selection criteria by double-clicking the group name in the Workspace window.
If you want to create more than one group, check the Keep this window open to create more groups box and click the Create Group button.
