
Compensation Wizard
A new interface is available to help you create compensation matrices quickly and rigorously! Launch the platform by selecting Platforms > Compensate Sample... > Wizard... If you select the compensation tubes (or a Group of compensation tubes) in the Workspace, they will be automatically loaded into the Wizard. Let it guide you through the process!
There are a number of short cuts that you can take to speed the process—specifically, create a gate on each compensation tube to identify lymphocytes or singlet beads; and, if necessary, create positive and negative gates for compensation tubes with mixed populations.
Once you have isolated the populations that will form the controls of your matrix, create a group from them, or just select them in the workspace. Open the Wizard and they will be listed as below. You can also open the Wizard and drag them in from the Workspace.

- Click in the Use column to tell the Wizard which tubes will be used in the compensation matrix. This is helpful if you wish to make multiple matrices from numerous tubes.
- For multiply stained samples, click on the disclosure triangle in the Color column to select the desired parameter.
- For tubes with multiple gates, click the names in the Positive or Negative column to select the desired gate from a drop-down list.
- Click the Validation Graph disclosure triangle and you will see graphic information displayed in the right pane of the Wizard as you work. The tube selected on the left will contribute graphs to this display. You can use these graphs to confirm your choice of controls in complex cases.
To quickly view a population's original graph, click the name of the positive or negative control itself, and select Open Graphic from the menu that drops down.
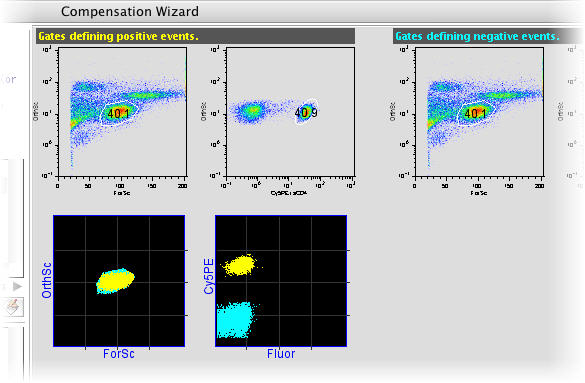
The Validation graphs display a gating ancestry of the selected positive and negative control populations. If you check the Show All Fluorescence Plots checkbox, the Wizard will also display bivariate graphs of other parameter pairs.
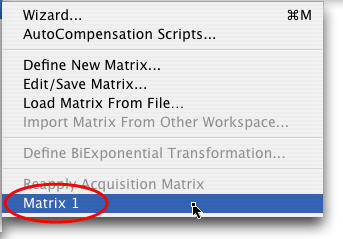
Text in the Wizard will guide you through the process until you have the right setup to create a compensation matrix. Click the Create Matrix... button. Give it a name (like Matrix 1) and it will appear at the bottom of the Platforms > Compensate Sample... menu. Select tubes in the Workspace to which you wish to apply the matrix, then select the matrix name in this menu.
Another example is available here in the pages of the Daily Dongle.