
AutoCompensation Scripts
1. Introduction
2. Set up the
workspace/template
3. Fill out the
Script Tool
4. Use the template
you have created
1. Introduction -
The purpose of this
functionality is to reduce the amount of time spent on compensating
numerous similar experiments. You can set up a template using these
instructions. When you drop a new set of samples on the template
they will be compensated automatically by the script generated by
this tool. This page will teach you how to set up a set of
compensation controls. You can exactly duplicate the steps below
using our Compensation
Demo Data or you can use your own single-stained control samples.
The AutoCompensation platform specifies several important instructions to FlowJo:
- How to identify the appropriate compensation tubes for any given experimental sample
- Which parameters are to be compensated
- What gates are to be applied to the compensation tubes to define the positive and negative controls
2. Setting up the Workspace/Template
There are some prerequisites that we must follow for this to be
useful. We have to make a workspace that can be saved as a template
for future experiments. In our example, we will be using a 4 color
data set collected on a DiVa based machine.
Notice the side scatter may show up as linear unless you check the log scaling in your 32 bit file conversions dialog in Preferences.
It will help if the compensation tubes had something not common with the experimental tubes. In this example, the single stain controls were named "[channel name] comp".
The first step is to create groups - one group per compensation control. This way we can retain gates for the comp controls in the template. It is easier to make the groups if you have some keyword to differentiate the samples. Do this during acquisition, and save time later.
The four-color experiment, after setting up the gates, looks like the figure below. There is one shared Lymph gate (fsc, ssc) and the single stain tubes' lymph gates were gated on the individual control channels in histogram mode, to create the positive and negative gates for each control.
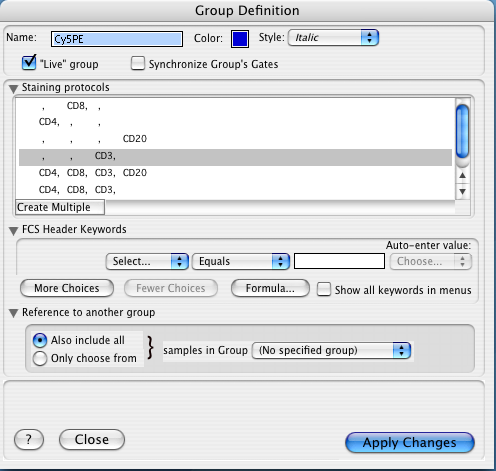
Four groups were then created, one for each control. I used the staining protocol definition to create the groups. For Example, for the Cy5PE group, the definition was:
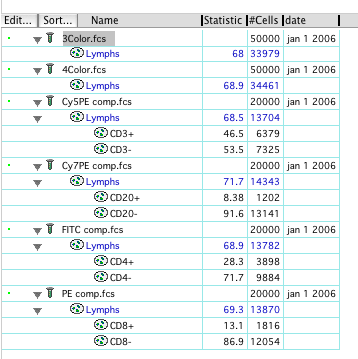
When done with the grouping, the workspace's group pane will look like this:

You can see by the disclosure triangles by the groups, that some nodes are attached. In this case, each group is gated with the Lymphs followed by the positive/negative gates for each control channel.
So for the Cy5PE control, the gating would be
>Lymphs
>>>Cy5PE+
>>>Cy5PE-
Hint - make your gating "lax." If you experience variation in the position of your clusters for positive/negative region, try to come up with a broad enough gate so it works from day to day.
Once all of our control samples are properly gated and grouped, you can invoke the scripting platform.
3. Fill out the Script Tool
On the main
menu click Platforms/Compensate/AutoCompensation
scripts:
A From the top
pulldown menu, click Create new.
The
first option, Define a rule for associating..
controls how FlowJo will differentiate the controls from the
experimentals.
It is important to include a common keyword here. For example $Date. We don't want to create comp matrices for tuesday's samples based on monday's comp controls.
You can be warned if automatically generated gates contain too few events to compensate with validity. Check the box if you wish to Validate the compensation process.
B Enter a threshhold number depending on the nature of your samples. Check the next box if you wish to Stop executing the script in addition to receiving the warning.
C If some or all of the samples are already compensated and you wish to override that calculation, check the ...override existing compensation settings box.
D Next, click Add compensation tube for.. and from the pulldown choose the fluors one by one. Notice the table in the Parameter section will grow as you do this. Then, for each parameter choose what keyword/value we should use as identifier, and which gates (already existing in our document) should be used to gather the spillover information:
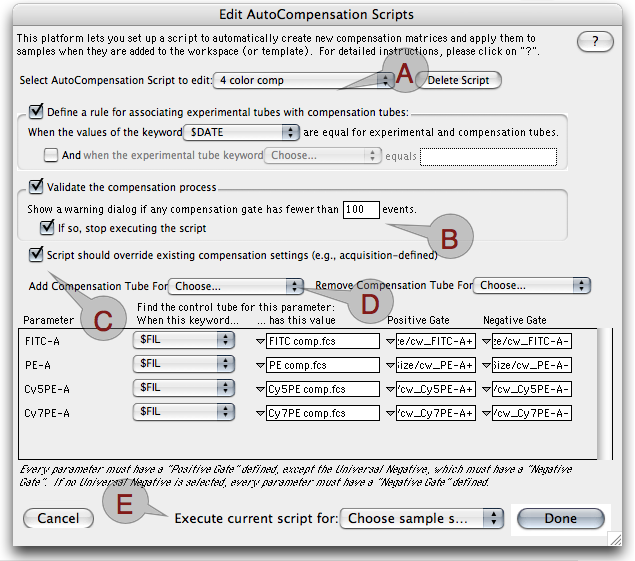
E Last step - from the Execute current... pulldown, choose which samples to compensate using this script. Finally, click Done. Now your workspace is ready to be saved as a template - do this from the File menu, Save as Template.
4. Using the template To use the template, open it, and add new, identically stained samples. Notice how they all end up in their proper groups and the purple compensation bar shows up? Your work is done.